Apple Berry Faux Tall & Skinny Soap Tutorial
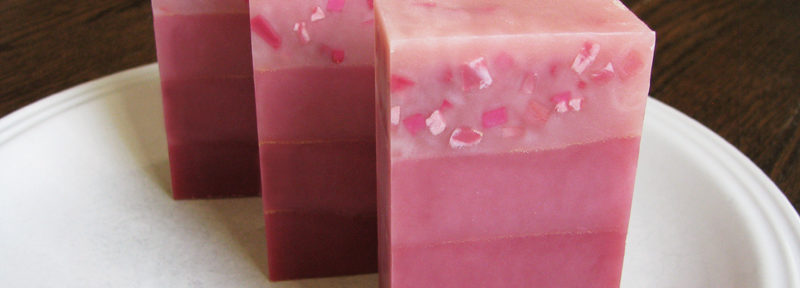
I’m kicking off Soap Queen’s #soaptherainbow series by turning my soap on its side – literally! This Apple Berry soap is actually created in a regular 5 lb. log mold with sliding bottom* and a multi-pour sectioning tool – NOT a tall & skinny mold! I’m a total sucker for fruity fragrances, so I came up with a combination of Apple Sage, one of Brambleberry’s newest fragrances and Holiday Candy, a classic from the Brambleberry line-up with sweet notes of berries and sugar, rounded out by a touch of rose and carnation. Both work really well in cold-process soap – no acceleration or discoloration that I found.

What You’ll Need:
58 oz. of oils (I used 33% tallow, 33% olive, 30% coconut, and 4% castor)
8.35 oz. lye (recalculate this amount if you change any of the oils!)
20 oz. water
1 ½ tsp. merlot mica
½ tsp. electric bubble gum colorant
¼ tsp. raspberry mica
1 ¼ tsp. gold sparkle mica
extra olive oil to mix with colorants
1.1 oz. Holiday Candy fragrance
1.1 oz. Apple Sage fragrance
5 lb. log mold with sliding bottom (liner optional)
Multi-Pour sectioning tool
A small paint brush
Whisk
Large kitchen knife & a ruler
optional: 2.5 oz. of soap scraps
(If you’ve never made cold process soap before, be sure to read up on the process. SoapQueenTV has some great information.)
Prepping colors and fragrance: In a small cup, combine the merlot mica, electric bubble gum, and raspberry micas with about a tablespoon of olive oil. Mix carefully and well. A mini mixer is a great tool to work out any clumps! In a separate cup, combine the gold sparkle mica with ½ T. of olive oil. Combine the Holiday Candy and Apple Sage fragrance oils in a glass container.
Prepping the mold: In order to make the soap taller, I ditched the silicone liner in favor of a paper one. (Here’s my video on how to line a log mold with freezer paper.)

Next, you’ll want to prep your sectioning tool by painting the gold mica and oil on each side of the silicone dividers. I learned this vertical mica line technique from Teressa Mahoney. After playing with several different ratios of mica to oil, I discovered that it was best to have the solution as thick as possible without being clumpy, and to apply it to the silicone dividers thinly on both sides. Use ALL of the mica & oil. Leave a ¼” border without any mica on both sides of the dividers as you spread it with the brush. You don’t want the mica to run off too much when you put the dividers in the mold (mine did a little).

Once you paint both sides of a divider, carefully set it in one of the grooves on an end piece. The end piece will actually hold them up pretty well without any extra support! Once you have all three finished, slide the other end piece onto the dividers and carefully set everything in the mold, making sure to keep pressure on the outside of the end pieces so none of the dividers fall out as you are placing them in the mold!

(Optional) Embed prep: If you have some small soap scraps you’d like to use to create some interest, chop them into tiny pieces with a kitchen knife. I used 2.5 oz. of scraps from my practice batches with this technique.
Now we can begin!
Step 1: Prep lye solution.
Use a plastic or stainless steel (never glass or pyrex!) container with a pour spout to weigh out the water portion. Slowly and carefully add the lye to the water and gently stir until the lye has fully dissolved and the liquid is clear. Cover with plastic wrap, and set aside to cool.
Step 2: Prep oils and begin!
Measure out the tallow and coconut oil into a large plastic container (I like to use gallon size ice cream buckets!) and melt in the microwave for two minutes, then stir until all has melted. Add the olive oil and castor oil. Once the lye water and the oils have cooled to 85-90 degrees, add the lye water to the oils and stick blend until emulsified or a very thin trace.

Step 3: Divide the soap into four parts.
Without the silicone liner, not all of the sections will be equal. I poured off just over 2 ½ cups of soap into three containers and what was left in my pot was enough when I added the embeds to it. If you aren’t using embeds, pour off exactly 2 ½ cups of soap in 2 containers (this will fill the middle two sections), then split the remaining soap into two other containers.

Step 4: Mix color and fragrance into each container.
For the ombre effect, pour HALF of the pre-mixed merlot blend into one part for the darkest section. Then pour a little over half of what is left into the next part, and a little over half again into the next, and what is left (which won’t be much!) into the last part and whisk each part to incorporate. Then, divide the fragrance equally into each color – just eyeball it – and whisk again.

Step 5: If you’re adding embeds, pour them into the lightest portion of soap and stir well with a spoon.

Step 6: Pouring!
Make sure all the colors are just starting to set up before you pour. I noticed that the lightest color set up first because it had the least amount of extra oil from the mica blend, so I started with that one first. Without the silicone liner, there’s some wiggle room for the sectioning tool, so I pushed it all the way to one side of the mold so that I had an extra large section for the soap with the embeds which made it easier to pour.

Make sure to pour just a little bit of each color into each section to prevent the soap from flowing under the dividers too much, THEN go back and fill each section. You may need to tap the mold down to release air bubbles as you go. (There will be some leftover soap batter after the mold is full.)

Step 7: Removing the dividers.
Once you have all of the sections filled up level with the top of the mold, it’s time to pull the dividers out. Pull each one straight out, one at a time. Don’t scrape the dividers as you pull them out of the mold. It will just mess up your mica line. Leave the end pieces because they help maintain the fill level.

Step 8: Cover and let it set up for 24 hours.
You can put the soap in a warm oven to force it to gel and create more vibrant colors. I set mine outside on my grill because it was so hot!!
Step 9: Cutting and trimming the soap.
First step is to take it out of the mold and cut off the end pieces from the sectioning tool with a large kitchen knife.

Once the soap has been freed, you can slice the log into bars. I’m a precision soapmaker and I like all my bars to end up close to the same size (3.5” x 2” x 1.25”), so after slicing the log with my wire cutter, I used a ruler to mark 2 1/8” across each bar and trimmed them off with a kitchen knife. This gives me room to plane off the other side of the bar where my mica lines ran a bit. If you don’t have a soap planer, you can use the kitchen knife or a vegetable peeler to trim it off if you like.

I ended up with twelve bars weighing 5.3-5.5 ounces before cure, plus a few end pieces and one thin bar. Cure for 4-6 weeks to allow the soap to fully harden and become mild.

More resources to help you achieve red soap:
Perfect Red in Cold Process Soap
4th of July Soap
*all links to Brambleberry products are affiliate links
Page with Comments
Comments are closed.
Beautiful, Amy!
Bet it smells good, love the merlot color you ended up with.
I LOVE this soap! How creative to get the tall and skinny look that way! Thanks for sharing, Amy!
Stunning soap! i cant wait to try this out. fingers crossed that i can execute this as well as you did. xoxo check out http://simplelifemom.com/2014/01/03/anti-aging-with-essential-oils/ for other suggestions of flavors! love it
Hey! I just saw this. Thanks so much for linking to me and trying out this technique. I LOVE how you used it in this mold. The gold looks amazing against the pink.
The colors are so beautiful, I’m a huge fan of gradients and colors. I found a great tutorial at gospaces.com/blog/how-to-make-soap-recipes-infographic but have found so much good information here. Thanks for the great tutorials!