
PVC Pipe Soap Experiment, Part 1
The idea for this Cherry Blossom soap came to me after I received the fragrance in mail as a thank you gift from Brambleberry for being on the SOAP Panel. That was exactly one month ago. Obviously I’ve slept a few times since then, so some of the things I had originally thought of, I sort of forgot. However, I will try to show you how this project has gone from start to, well, NOW.
First, I ran my idea past Hubby. He’s not only a general contractor, he’s also an engineer, which means he is an excellent problem solver. My problem: how to practically make this idea come to life. My thoughts were to have 7 small logs of soap embedded into one large log of soap in the shape of a flower, so when you cut the soap, it looks something like this:

This would mean making soap in 1/2″ PVC pipe. And how on earth do you get soap out of a pipe that is so small? Enter exhibit A:
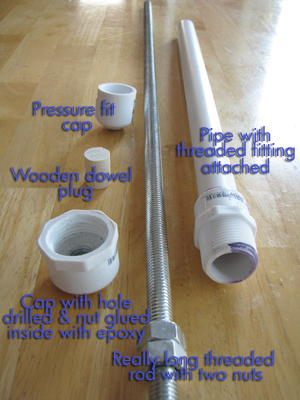
Of course I had 7 of the pipes with the threaded fittings attached and 7 caps for the bottom. I had to sand the sharp corners off so I could use a doubled over piece of plastic wrap underneath the cap without cutting it. Then I stood them up in a plastic pitcher, and poured the soap in using a small funnel:

Let me just say here that I used a water discount on this soap, and there was no added fragrance at this point. I also added some salt to the lye water to help it harden a little bit faster (as well as some titanium dioxide to make it white). I was still on pins and needles, wondering if the soap would actually come out! Last night my parents came through on their way to a conference in St. Louis, so my dad got roped into helping us! I had put the pipes full of soap into the freezer for about four hours when we pulled them out to test our contraption. It went together like this:

First, I took the cap and plastic wrap off the bottom. Then Hubby took a wrench, attached it to the back nut, and started turning the rod. My dad helped hold the pipe steady, and I was the one who caught the soap!
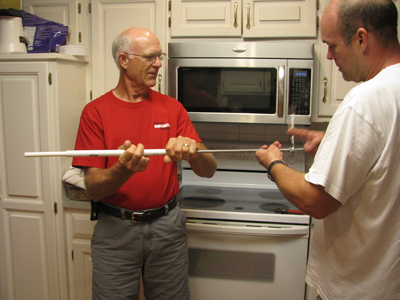
After turning the wrench all the way until the soap popped out for the first couple of pipes, Hubby decided to get it started with the wrench and then take the threaded cap off and just push the rod the rest of the way through. That was definitely faster! I am happy to report that they all came out perfectly like this:

Part Two tells how they got embedded into a 3″ PVC pipe soap.
Page with Comments
Comments are closed.
This is very exciting! I’m thinking your contractor/engineer hubby really came in handy on this one for sure! I’m not even going to try to comprehend how it all goes together. 😛
Oh oh~ I can’t wait to see the final product! So excited! the men in your house are so handy!
Ooh, this looks exciting. Can’t wait to see part two!
That is amazing that you have such a handy husband and I love this idea but it’s too complicated for me to do. Sounds like it’s going to be a pretty soap. You should charge $10 a bar for all the work that went into it.
Michelle
This is amazing. I can’t wait to see the finished soap!
Wow! That’s engineering at it’s finest! You have WAY more patience than me! Cannot wait to see the final version.
great post! This was actually next on my to try out list.
What a handy duo to have around =) I can’t wait for part two!
What a fun project…I’m off to read Part 2!
Wow – you continue pushing the envelope when it comes to soap making. A most innovative approach.